Polyobject
PolyObjects are special sets of one-sided linedefs which, unlike any other lines, can be moved on the map during gameplay. Unlike the Hexen implementation of PolyObjects, Eternity does not restrict these objects to one per subsector, and they are also allowed to move any distance from their spawn point, even across subsector boundaries.
PolyObjects fully clip normal objects such as the player and enemies, optionally doing crushing damage depending upon the type of spawn spot used. They also block bullet tracers and monsters' lines of sight. They do not, however, clip sound propagation, so it may be necessary to use sound blocking lines near areas where PolyObjects are meant to function as a normal wall until they move.
Although Eternity does allow PolyObjects to move between different subsectors, this will only work properly if the subsectors on both sides of a line have the same properties (floor & ceiling heights, light level, and flat). However, since the implementation of dynasegs, Eternity does not require a "PolyObject-aware" node builder.
Finally, Eternity allows PolyObjects to be used in DOOM-format maps via the use of ExtraData. See the subsections below for more information on how to create and move PolyObjects.
- Back to Linedef types
Creating PolyObjects[edit]
PolyObjects are a combination of a set of lines, which are typically placed in a "control sector" area outside of the main map, and exactly two mapthings: one spawn spot, and one anchor point. There are two different methods for grouping lines into a PolyObject.
The lines are typically one-sided walls, but two-sided line polyobjects are also possible.
Method 1: The Polyobj_StartLine Special[edit]
- The
348:Polyobj_StartLine(polyobj_id, mirror_id)special marks the first line in a PolyObject which is made up of a cyclic set of linedefs (that is, each line "points toward" the next line, ending at the first vertex of the first line).
- Diagrammatic Example:
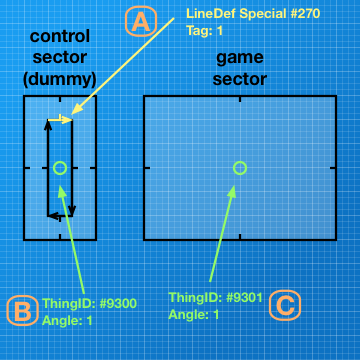
- Assume that the linedef A is assigned the
Polyobj_StartLinespecial and has argument #1 set to "1" -- this is its PolyObject ID number, which must be unique amongst all on the map, and must be a number greater than zero.

- Starting from line A, the engine will go from vertex to vertex, adding the first line found which shares the current line's second vertex as its first vertex. In this example, since the object is closed as is required, the process will end at the first vertex of line A, and there will be four lines in the PolyObject (note that unlike Hexen, there is NO limit to the number of lines that can be placed in one PolyObject).
- Now, once the lines are added, it is necessary to define the control objects. Points B and C are the two required objects:
- B: This is the PolyObject's anchor point (type EEPolyObjAnchor with DoomEd #9300). It defines the point relative to which all the lines in the PolyObject will be translated to the spawn point. This object's angle must be set to the same value as the StartLine's first argument (the PolyObject ID). There must be one and only one of these objects for each PolyObject ID.
- C: This is the PolyObject's spawn point (one of EEPolyObjSpawnSpot [9301] or EEPolyObjSpawnSpotCrush [9302]). It defines the point where the PolyObject will initially spawn on the map. The anchor point will be translated to this exact location, and all lines in the PolyObject will maintain their relative positions to it. This object must also have its angle field set to the same value as both the StartLine's first argument and the anchor point's angle field. There must be one and only one of these objects for each PolyObject ID. Use 9302 to cause the PolyObject to do crushing damage to things that block it while it is in motion.
- Note that when you use this method, the other lines belonging to the PolyObject can be given their own line specials, including ones which affect the PolyObject itself. When the player presses the PolyObject, the specials will work as expected.
- The complete arguments to
Polyobj_StartLine(polyobj_id, mirror_id)are as follows:- polyobj_id : the unique ID number (greater than zero) of the PolyObject
- mirror_id : the ID number of a PolyObject that you want to mirror every action that affects this PolyObject. This number cannot be the same as the PolyObject's own ID.
- In order to use this line special in a DOOM-format map, it is necessary to use ExtraData. In that case, you must give the line you want to have the Polyobj_StartLine special the ExtraData linedef control special (#270) instead, and then specify Polyobj_StartLine and its arguments in its corresponding ExtraData linedef record.
Method 2: The Polyobj_ExplicitLine Special[edit]
- The
349:Polyobj_ExplicitLine(polyobj_id, index, mirror_id)special demarcates every line that will be added to a PolyObject and the exact order in which the lines will be added. This affords a bit more flexibility in the construction of PolyObjects at the price of not allowing any other line specials to be placed on the object itself.
- Diagrammatic Example:
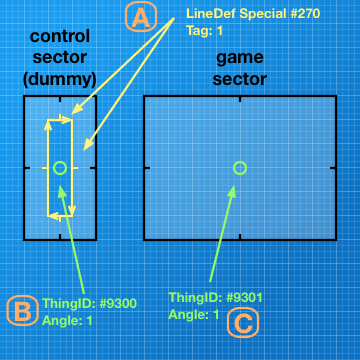
- Assume that the linedefs labeled 1 through 4 are assigned (via ExtraData) the
Polyobj_ExplicitLinespecial, all have argument #1 set to "1" -- this is its PolyObject ID number (which must be unique amongst all on the map, and must be a number greater than zero), and argument #2 set also to whatever their tag is (in this case again it's 1).

- The game engine will search through all linedefs in the entire map for ones with the current PolyObject ID in argument #1 and a value greater than zero in argument #2. The lines will be collected and then sorted by the LineDef id.
- Now, once the lines are added, it is necessary to define the control objects. This is exactly the same as it is for the
StartLine(...)special above.- B: This is the PolyObject's anchor point (type EEPolyObjAnchor with DoomEd #9300). It defines the point relative to which all the lines in the PolyObject will be translated to the spawn point. This object's angle must be set to the same value as the
ExplicitLines'first argument (the PolyObject ID). There must be one and only one of these objects for each PolyObject ID. - C: This is the PolyObject's spawn point (one of EEPolyObjSpawnSpot [9301] or EEPolyObjSpawnSpotCrush [9302]). It defines the point where the PolyObject will initially spawn on the map. The anchor point will be translated to this exact location, and all lines in the PolyObject will maintain their relative positions to it. This object must also have its angle field set to the same value as both the ExplicitLines' first argument and the anchor point's angle field. There must be one and only one of these objects for each PolyObject ID. Use 9302 to cause the PolyObject to do crushing damage to things that block it while it is in motion.
- B: This is the PolyObject's anchor point (type EEPolyObjAnchor with DoomEd #9300). It defines the point relative to which all the lines in the PolyObject will be translated to the spawn point. This object's angle must be set to the same value as the
- The complete arguments to
Polyobj_ExplicitLine(polyobj_id, index, mirror_id)are as follows:- polyobj_id : the unique ID number (greater than zero) of the PolyObject
- index : specifies the order in which the line will be added to the PolyObject. This number should be unique amongst all lines to be added to the same object, and must be a value greater than zero.
- mirror_id : the ID number of a PolyObject that you want to mirror every action that affects this PolyObject. This number cannot be the same as the PolyObject's own ID.
- In order to use this line special in a DOOM-format map, it is necessary to use ExtraData. In that case, you can either give the lines you want to have the Polyobj_ExplicitLine special the ExtraData linedef control special (#270) instead, and then specify Polyobj_ExplicitLine and its arguments in all the corresponding ExtraData linedef records; or simply use the line special normally, and specify the ExtraData record number in the linedef's tag, specifying only the arguments inside the ExtraData record.
Note[edit]
As of EE 3.37.00, thing type 9303 is available, which is similar to the ZDoom damaging polyobject type.
Moving PolyObjects[edit]
There are two types of basic motion which PolyObjects can currently undergo: translation and rotation. Using "override" actions, it is possible to combine the two to have a PolyObject which rotates while moving in the xy plane.

Translating PolyObjects[edit]
To move a PolyObject in the xy plane, use one of the following line specials:
Polyobj_Move(polyobj_id, speed, angle, dist)Polyobj_OR_Move(polyobj_id, speed, angle, dist)
Both of these line specials use the same arguments:
- polyobj_id : Specifies which PolyObject to intially move. If the object is already moving, nothing will happen unless the action is Polyobj_OR_Move. If this object has a mirror, the same action will be recursively applied to every mirror PolyObject, reversing the angle of movement for each subsequent mirror.
- speed : Speed of the motion in eighths of a unit per tic.
- angle : Byte angle specifying the direction of motion. To convert from degrees to byte angles, use this formula: byteangle = (degrees * 256) / 360. Round or chop the result to an integer. 0 means East, 64 means North, 128 means West, and 192 means South.
- dist : The total distance to move the object in units.
All PolyObjects will inflict thrust on objects which block them with force proportional to the speed of motion. If the PolyObject was spawned with the EEPolyObjSpawnSpotCrush object (DoomEd num 9302), then if the object does not fit at the location it is being pushed toward, it will be damaged 3 hitpoints per tic (105 damage per second).
Rotating PolyObjects[edit]
To rotate a PolyObject, use one of the following line specials:
Polyobj_RotateRight(polyobj_id, aspeed, adist)Polyobj_OR_RotateRight(polyobj_id, aspeed, adist)Polyobj_RotateLeft(polyobj_id, aspeed, adist)Polyobj_OR_RotateLeft(polyobj_id, aspeed, adist)
All these line specials use the same arguments:
- polyobj_id : Specifies which PolyObject to initially rotate. If the object is already moving, nothing will happen unless the action is Polyobj_OR_RotateRight or Polyobj_OR_RotateLeft. If this object has a mirror, the same action will be recursively applied to every mirror PolyObject, reversing the direction of rotation for each subsequent mirror.
- aspeed : Angular speed of the rotation in byte angles per tic. Same as for the "angle" parameter to Move actions.
- adist : Angular distance to rotate in byte angles. Same as for aspeed, except with two special caveats:
The byte angle value 0 (zero) means to rotate exactly 360 degrees.
The byte angle value 255 means to rotate perpetually. This type of action never ends and thus only override actions can subsequently be applied to the PolyObject.
PolyObject Examples[edit]
PolyObject Demo[edit]
A demonstration of both rotating and translating PolyObjects. Plays on Doom 2 / Map01. The map is linked to an ExtraData lump (via EMAPINFO).
It is recommended that you open the Demo WAD in a WAD manager program like SLADE3 or XWE to read the ExtraData and ACS scripts together with provided comments. For example this script explains how LineDefs are configured for a manually operated rotating PolyObject:
//===============================
//= MANUALLY ROTATING POLYOBJECT
//=============================

// This PolyObject doesn't move unless activated by a a nearby switch.
linedef {
  recordnum = 2
  special = PolyObj_StartLine
  args = { 2 }
}

linedef {
  recordnum = 3
  extflags = "use player" // Defines how the LineDef action is activated.
                          // The lack of "repeat" flag means it's a one-time
                          // action.

  special = Polyobj_RotateRight
  args = { 2, 2, 255 }  // Starts Rotating PolyObject with PolyID: 2
                        // at a speed of 2 units and angular distance
                        // of 255 units - which means it'll rotate
                        // continuously.
}  (...)
PolyObject Advanced Demo[edit]
A demonstration of rotating and translating PolyObjects made with PolyObj_ExplicitLine() Plays on Doom 2 / Map01. The map is linked to an ExtraData lump (via EMAPINFO). It shows how more advanced PolyObjects can be constructed and moved to fake 3D objects. It also includes PolyObject Doors discussed in the next section of this article.
It is recommended that you play go through the first Demo in the series and open the Demo WAD in a WAD manager program like SLADE3 or XWE to read the ExtraData and ACS scripts together with provided comments.
PolyObject Doors[edit]
There are two distinct types of actions provided to allow PolyObjects to function as doors: swinging and sliding. There are no override versions of door actions, and applying other overrides to currently moving PolyObject doors will most likely cause the doors to malfunction and move erratically.
All PolyObject doors accept a delay parameter, and this specifies the amount of time the door will wait before closing. A door which is closing will reopen if blocked by an object.
Swinging PolyObject Door[edit]
 |

|
| PolyObject swinging door schema | PolyObject swinging door |
Polyobj_DoorSwing (polyobj_id, aspeed, adist, delay)
This action creates a swinging door from a PolyObject and takes the following arguments:
- polyobj_id : The ID number of PolyObject to affect. Mirroring works for doors as well and is the most common use for PolyObject mirroring.
- aspeed : Angular speed in byte angles per tic.
- adist : Angular distance to rotate when opening, and again but in the opposite direction when closing.
- delay : Amount of time before the door attempts to close after fully opening in tics. If the door is forced to reopen due to being blocked, it will also wait this amount of time before once again closing.
Swinging doors currently only rotate left. A right-rotating swinging door special will be added in the near future.
Sliding PolyObject Door[edit]
 |

|
| PolyObject sliding door schema | PolyObject sliding door |
Polyobj_DoorSlide (polyobj_id, speed, angle, dist, delay)
- This action creates a sliding door from a PolyObject and takes the following arguments:
- polyobj_id : The ID number of PolyObject to affect. Mirroring works for doors as well and is the most common use for PolyObject mirroring.
- speed : Speed of the door's opening and closing in eighths of a unit per tic.
- angle : Byte angle of door's initial motion. This angle is reversed when the door closes.
- dist : Distance the door moves when opening, and again when closing, in units.
- delay : Amount of time before the door attempts to close after fully opening in tics. If the door is forced to reopen due to being blocked, it will also wait this amount of time before once again closing.
PolyObject Door Examples[edit]
PolyObject Doors Demo[edit]
A demonstration of both swinging and sliding doors, mirrored and single. Plays on Doom 2 / Map01. The map is linked to an ExtraData lump (via EMAPINFO).
It is recommended that you open the Demo WAD in a WAD manager program like SLADE3 or XWE to read the ExtraData scripts together with provided comments. For example the first script explains how LineDefs are configured for a single swinging door:
//=============================
//= BASIC SINGLE SWINGING DOOR
//===========================
linedef {
  recordnum = 1 // corresponds to a LineDef with action: 270, tag: 1

  special = PolyObj_StartLine // this defines the current LineDef as a
                              // starting point for the PolyObject

  args = { 1 }  // since this is a very basic PolyObj, it requires only one
                // argument (it's not to be confused with LineDef / Sector tag)
}

linedef {
  recordnum = 2 // corresponds to a LineDef with action: 270, tag: 2

  extflags = "use player repeat" // describes how the LineDef is activated

  special = PolyObj_DoorSwing
  args = { 1,20,64,160 } // swing the door with PolyId: 1, AngularSpeed: 20
                         // AngularDeistance 64 units (90 deg),
                         // Delay: 160 tics
}  (...)
Polyobjects with portals[edit]
Polyobjects with 2-sided lines[edit]
Polyobjects made of 2-sided lines have always worked in all games which had polyobjects, but with limitations. Keep in mind that Polyobj_StartLine only works for closed polygons of linedefs going the same way. Otherwise, use Polyobj_ExplicitLine for all involved lines. You will need to use an OPEN ACS script with the SetLineSpecial and SetLineActivation if you want lines with Polyobj_ExplicitLine to have in-game activation effects. In Eternity, a polyobject can have any number of one-sided and two-sided lines.
As of Eternity 4.06.00, the following improvements have been made to 2-sided lines belonging to polyobjects:
- Passable lines no longer push things standing in their way, if they can just move into them (normally in Hexen they would push). Pushing will only happen on the category of solid things affected by the specific blocking type (monsters, players or both)
- Textures will retain their initial Y offset when the line moves across different sector elevations. Previously in Hexen they would always make sure the Y offset agrees to the current sectors where they're located.
- No more collision detection influenced by the source control sector. Previously in Hexen you would need to match the height of the control sector with the one of the game sector. Normally this wasn't an issue, because of the subsector restriction, which no longer exists in Eternity.
- 2-sided lines with actions will also trigger if actor stands still and is crossed by the polyobject.
- 3DMidTex lines now work properly and as expected. You can use them as horizontal moving platforms.
- Impassable 2-sided lines also behave as transporters to things above if moving below sector portals.